こんにちは、のっくんです。
今回はゲームアプリに以下のようなアニメーションを設定してみたいと思います。
左のボタンに合わせて、キャラクターが右、左に走ります。
アニメーションを設定することでキャラクターが動くようになるのでグッとゲームらしくなります。
[toc]アニメーションに使うテキスチャをアセットに取り込む
アニメーションには複数枚のテキスチャ(画像)を使用します。
右クリックで「New Sprite Atras」を選択してフォルダを生成します。
フォルダ名をNokkumanにして、その中にテキスチャを入れます。
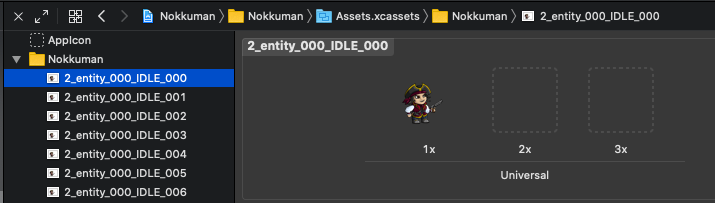
テキスチャを順番に表示することでパラパラ漫画のようにアニメーションを設定していきます。
アニメーションを作る
アニメーションを作るには、テキスチャアトラスを使います。
https://developer.apple.com/documentation/spritekit/sktextureatlas/about_texture_atlases
先ほど追加したテキスチャを順番に切り替えてアニメーションを作成します。
何もしていない時のアイドル状態、走っている状態の2つのアニメを作ります。
 // テキスチャからアニメーションを作成する
    func createAnimations() {

        // 何もしていない時のアニメーションを追加するよ
        let idleFrames:[SKTexture] =
            [textureAtlas.textureNamed("2_entity_000_IDLE_000"),
             textureAtlas.textureNamed("2_entity_000_IDLE_001"),
             textureAtlas.textureNamed("2_entity_000_IDLE_002"),
             textureAtlas.textureNamed("2_entity_000_IDLE_003"),
             textureAtlas.textureNamed("2_entity_000_IDLE_004"),
             textureAtlas.textureNamed("2_entity_000_IDLE_005"),
             textureAtlas.textureNamed("2_entity_000_IDLE_006"),
        ]

        // 1フレームあたりの表示時間は0.14秒
        let idleAction = SKAction.animate(with: idleFrames, timePerFrame: 0.14)
        idleAnimation = SKAction.repeatForever(idleAction)

        // 走っているアニメーションを追加するよ
        let runFrames:[SKTexture] =
            [textureAtlas.textureNamed("2_entity_000_RUN_000"),
             textureAtlas.textureNamed("2_entity_000_RUN_001"),
             textureAtlas.textureNamed("2_entity_000_RUN_002"),
             textureAtlas.textureNamed("2_entity_000_RUN_003"),
             textureAtlas.textureNamed("2_entity_000_RUN_004"),
             textureAtlas.textureNamed("2_entity_000_RUN_005"),
             textureAtlas.textureNamed("2_entity_000_RUN_006"),
            ]

        // 1フレームあたりの表示時間は0.14秒
        let runAction = SKAction.animate(with: runFrames,timePerFrame: 0.14)

        runAnimation = SKAction.repeatForever(runAction)

    }
キャラクターの向きを変える
左に行く時は左向き、右に行く時は右向きにします。
SKActionのscaleXを使ってX軸の向きを反転させます。
    func lookForward(){
        let flipTexturePositive = SKAction.scaleX(to: 1, duration: 0)
        self.run(flipTexturePositive)
    }

    func lookBackward(){
        let flipTextureNegative = SKAction.scaleX(to: -1, duration: 0)
        self.run(flipTextureNegative)
    }
キャラクターを走らせる、アイドル状態にする
先ほど作成したアニメーションを有効にします。
    // キャラクターを走らせる
    func startRunAnimation(){
        self.run(runAnimation, withKey: "runAnimation")
    }

    // キャラクターをアイドル状態にする
    func startIdleAnimation(){
        self.run(idleAnimation, withKey: "idleAnimation")
    }
ボタンを作る
GameSceneの中にボタンを作って配置します。
    func setupButtons(){
        // 四角形の大きさを決める
        let Rect = CGRect(x: 0, y: 0, width: 40, height: 40)
        // ovalInを指定すると円を作成する
        let circle = UIBezierPath(ovalIn: Rect)

        let leftMove = SKShapeNode(path: circle.cgPath, centered: true)

        leftMove.position = CGPoint(x:70, y:35)

        leftMove.name = "Left"

        addChild(leftMove)

        let rightMove = SKShapeNode(path: circle.cgPath, centered: true)

        rightMove.position = CGPoint(x:120, y:35)

        rightMove.name = "Right"

        addChild(rightMove)
    }
ボタンを押した時、離した時の処理
ボタンを押したらアニメーションを動かします。
    override func touchesBegan(_ touches: Set<UITouch>, with event: UIEvent?) {
        // タッチしたボタンによって処理を分ける
        for touch: AnyObject in touches {
            let location = touch.location(in: self)
            let node = self.atPoint(location)

            if (node.name == "Left") {
                self.nokkuman.lookBackward()
                self.nokkuman.startRunAnimation()
                self.nokkuman.physicsBody?.velocity = CGVector(dx: -100, dy: 0)
            } else if (node.name == "Right") {
                self.nokkuman.lookForward()
                self.nokkuman.startRunAnimation()
                self.nokkuman.physicsBody?.velocity = CGVector(dx: 100, dy: 0)
            }
        }
    }
ボタンを離した時の処理は以下の通り。
 override func touchesEnded(_ touches: Set<UITouch>, with event: UIEvent?) {

        for touch: AnyObject in touches {
            let location = touch.location(in: self)
            let node = self.atPoint(location)

            if (node.name == "Left" || node.name == "Right") {
                self.nokkuman.physicsBody?.velocity = CGVector(dx: 0,dy: 0)
                self.nokkuman.startIdleAnimation()
            }
        }
    }
終わりに
いかがでしたでしょうか。
アニメーションを設定するとゲームらしくなりますね。